Leveraging Lambda@Edge for Optimized Application Behavior
SHARE THE BLOG
AWS CloudFront with Lambda@Edge
Lambda@Edge extends the capabilities of AWS Lambda to the CloudFront global content delivery network. It allows you to execute code responding to CloudFront events like viewer request, origin request, origin response, and viewer response. This enables developers to customize the content delivery process based on specific requirements and conditions.
Lambda@Edge Key Features
- Serverless Execution: Lambda@Edge operates in a serverless environment, eliminating the need for managing infrastructure. You only pay for the compute time your functions consume.
- Global Edge Locations: AWS CloudFront has a vast network of edge locations worldwide. With Lambda@Edge, your code can run at these edge locations, significantly reducing latency and enhancing the user experience.
- Event-Driven Architecture: Functions in Lambda@Edge are triggered by CloudFront events, such as user requests or responses from the origin server. This event-driven architecture allows for dynamic content manipulation at the edge.
- Scalability: The serverless nature of Lambda@Edge ensures automatic scalability, effortlessly handling varying workloads and traffic patterns.
Lambda@Edge Use Cases
- Dynamic Content Personalization: Lambda@Edge can customize content based on user preferences, geolocation, or device types—for example, customizing website content for users from different regions.
- Security and Access Control: Implement security measures at the edge by validating and securing requests. You can enforce security policies, perform access checks, and mitigate potential threats before reaching the origin.
- Optimizing Images and Assets: Resize, compress, or transform images on the fly to match the device’s capabilities or improve page load times. This is particularly useful for delivering optimized content to diverse devices.
- A/B Testing: Conduct A/B testing by directing different users or groups to alternative versions of your application. Lambda@Edge allows for real-time adjustments in response to user interactions.
- Bot Mitigation: Identify and block malicious bots at the edge, protecting your origin server from unnecessary traffic and potential threats.
Lambda@Edge Demo
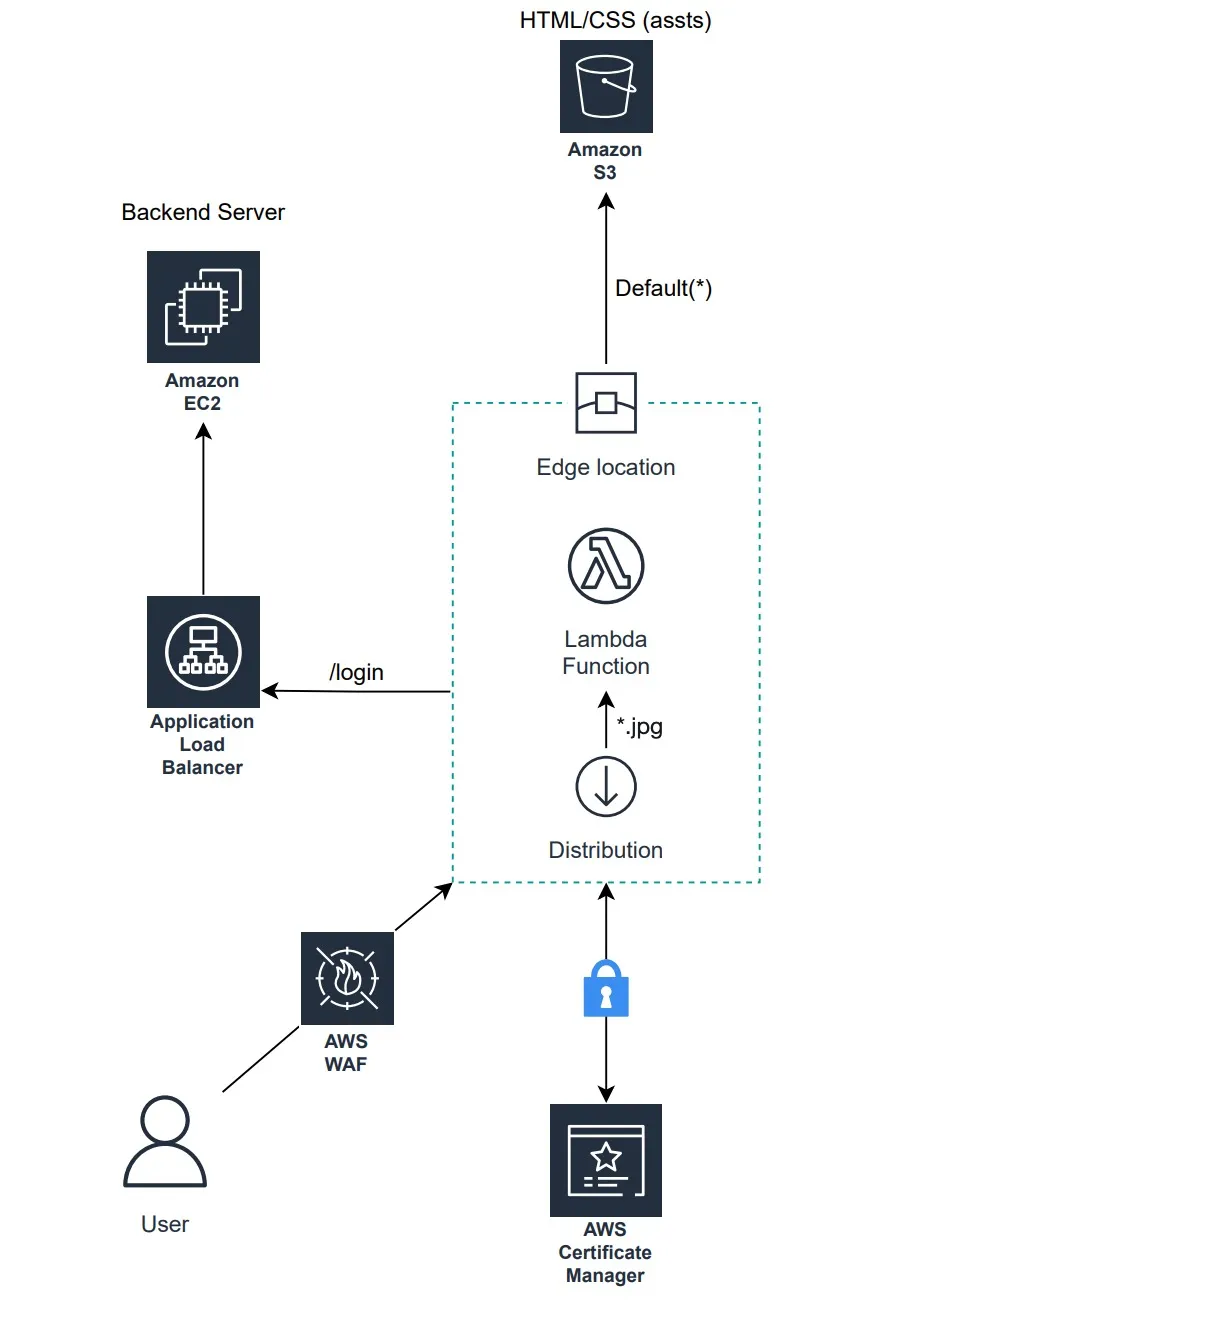
This article will guide you through the deployment of a simple and basic website on AWS, consisting of both frontend and backend components. The website comprises two web pages, with the first one designed to simulate a login process. Here, users can input their email and password through a login form, and upon clicking the login button, an API in the backend server is triggered. Following a successful login, the website will dynamically display random content featuring a centrally placed image. The image’s appearance will vary based on the device used to access the webpage. Specifically, if viewed from an Android device, the image will transform into an Android mobile phone; for iOS devices, an iOS device will be displayed, and when accessed from a web browser, the image will depict a laptop.
The website’s backend is deployed on an EC2 instance, with an application load balancer interfacing it. The frontend is stored in an S3 bucket with active static website hosting. A CloudFront CDN is set up with S3 as its origin, configured with two behaviors — one for managing website content and another for handling images. Lambda@Edge is enabled within the latter to execute image processing logic.
Backend Code and Deployment
The backend code utilizes the NodeJS framework and presents a simple API created to simulate the login process without implementing authenticating logic. The following is the code snippet employed for this purpose.
					let express = require('express');
var cors = require('cors')

let app = express();
app.use(cors());

app.listen(3000, () => {
 console.log('Server running on port 3000');
});

app.get('/login', (req, res, next) => {
    res.status(200).json({
        message: 'success'
    });
});
The code is installed on an EC2 instance running Ubuntu as its operating system. Once the server is operational, NodeJS, NPM, and Nginx packages must be installed to execute the server and set up a proxy for directing traffic to the local server.
					sudo apt install npm -y && sudo apt install nodejs
sudo apt install nginx
Subsequently, the server packages are installed, and the backend project is initiated by navigating into the backend code directory which contains the above code in index.js, and executing the following commands.
					npm init
npm install --save express cors
node index.js
The server is expected to be running on port 3000 now. In a new session, the Nginx configuration must be applied to route the traffic to the running server.
					cd /etc/nginx/conf.d
touch nginx.conf
Then the below configuration is added to the newly created nginx.conf
					server {
    listen 80;
    server_name _;

    location / {
        proxy_pass http://localhost:3000;
        proxy_set_header Host $host;
        proxy_set_header X-Real-IP $remote_addr;
        proxy_set_header X-Forwarded-For $proxy_add_x_forwarded_for;
        proxy_set_header X-Forwarded-Proto $scheme;
    }

    # Additional configurations can be added as needed
    error_page 500 502 503 504 /50x.html;
    location = /50x.html {
        root /usr/share/nginx/html;
    }
}
And finally, Nginx needed to be restarted to reflect the new configuration.
sudo systemctl restart nginx
These are the configurations required on the server side. Following this, it is necessary to create a new AWS Application Load Balancer to route traffic to the EC2 instance hosting the backend code. The EC2 instance is set up as a target group for the load balancer.
Frontend Code and Deployment
As mentioned previously, the demonstration website comprises two basic web pages emulating the login process and the home page. Both pages are constructed using simple HTML code. Below is the index.html which creates a very simple form to allow users to log in and call the login API from the server we provisioned earlier.
					<!DOCTYPE html>
<html>

<head>
 <title>Login Form</title>
 <script>
  function login() {
   var apiUrl = '{{BACKEND_URL}}';
   fetch(apiUrl, {
    headers: {
     'Content-Type': 'application/json',
    }
   }).then((data) => {
    console.log(data);
    location.href = './home.html';
   });
  }
 </script>
</head>

<body>
 <h2>Login Page</h2><br>
 <div class='login'>
  <label><b style='line-height: 300%;'>User Name</b>
  </label><br />
  <input type='text' name='Uname' id='Uname' placeholder='Username'>
  <br><br>
  <label><b style='line-height: 300%;'>Password
   </b>
  </label>
  <input type='Password' name='Pass' id='Pass' placeholder='Password'>
  <br><br>
  <button onclick='login()'>Login</button>
  <br><br>
  <input type='checkbox' id='check'>
  <span>Remember me</span>
  <br><br>
 </div>
</body>
</html>
The following HTML page simulates the presentation of a homepage following a successful login on the preceding page. The HTML code is simple, and in the first active div section, an image of a laptop is displayed. Subsequently, when Lambda@Edge is configured, the images will dynamically change based on the device rendering the webpage.
<!DOCTYPE html>
<html lang='en'>
<head>
<meta charset='utf-8'>
<meta name='viewport' content='width=device-width, initial-scale=1, maximum-scale=1'>
<title>Demo</title>
<!--GOOGLE FONT -->
<link href='http://fonts.googleapis.com/css?family=Open+Sans' rel='stylesheet' type='text/css'>
</head>
<body>
<!--NAV SECTION -->
<header id='header-nav' role='banner'>
<div id='navbar' class='navbar navbar-default'>
<div class='navbar-header'>
<button type='button' class='navbar-toggle' data-toggle='collapse' data-target='.navbar-collapse'>
<span class='sr-only'>Toggle navigation</span>
<span class='icon-bar'></span>
<span class='icon-bar'></span>
<span class='icon-bar'></span>
</button>
</div>
</div>
</header>
<!--END NAV SECTION -->
<!--SLIDE CAROUSEL SECTION -->
<section id='slide-head' class='carousel'>
<div class='carousel-inner'>
<div class='item active'>
<div class='container'>
</div>
</div>
<!-- ./ first active div-->
<div class='item'>
<div class='container'>
<div class='carousel-content'>
<img height='100' width='300' style='margin-bottom: 2%;' src='./assets/img/logos/laptop.png'>
<p class='lead'>
Lorem ipsum dolor sit amet, consectetur adipiscing elit. Nulla nec enim sapien.<br>
<a href='#' class='btn btn-primary btn-lg margin-top-20'>Download Now</a>
</p>
</div>
</div>
</div>
<!-- ./ Second div-->
</div>
<a class='prev' href='#slide-head' data-slide='prev'><i class='fa fa-angle-left'></i></a>
<a class='next' href='#slide-head' data-slide='next'><i class='fa fa-angle-right'></i></a>
</section>
<!--END SLIDE CAROUSEL SECTION -->
<!--ABOUT SECTION -->
<section id='about-section'>
<div class='wrap-pad'>
<div class='row'>
<div class='col-md-8 col-md-offset-2 col-sm-10 col-sm-offset-1 '>
<div class='text-center'>
<h1><i class='fa fa-wrench small-icons bk-color-brown'></i>Title</h1>
<img height='250' width='500' style='margin-bottom: 2%;' src='./assets/img/devices/labtop.jpg'>
<p class='lead'>
Lorem ipsum dolor sit amet, consectetur adipiscing elit. Nulla nec enim sapien. Aliquam erat
volutpat.
Quisque eu ante at tortor imperdiet gravida nec sed turpis. Phasellus augue augue.
</p>
</div>
</div>
<!-- ./ Heading div-->
<!-- ./ Content div-->
</div>
</div>
</section>
<!--END ABOUT SECTION -->
<!--FOOTER SECTION -->
<footer id='footer'>
<div class='row'>
<div class='col-md-12 col-sm-12'>
© | All Rights Reserved
</div>
</div>
</footer>
</body>
</html>
The code above, along with three images depicting distinct device types — laptop, Android device, and iOS device — should be uploaded to an S3 bucket with static website hosting enabled.
AWS CloudFront and Lambda@Edge
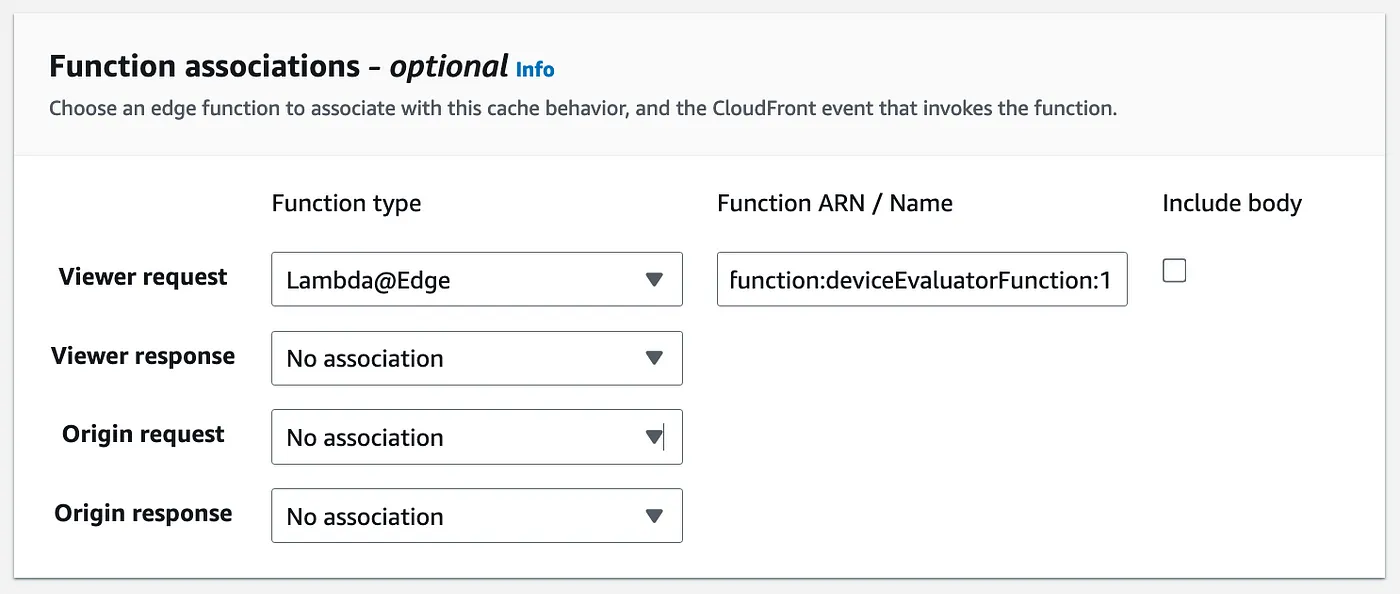
To deliver the frontend content along with static assets, including images, from edge locations, an AWS CloudFront CDN distribution is created. The distribution has a single origin, which is the S3 bucket storing the frontend application, configured with two distinct behaviors — the default one and one specifically for images. Subsequently, function association will be configured for the image’s CDN behavior.
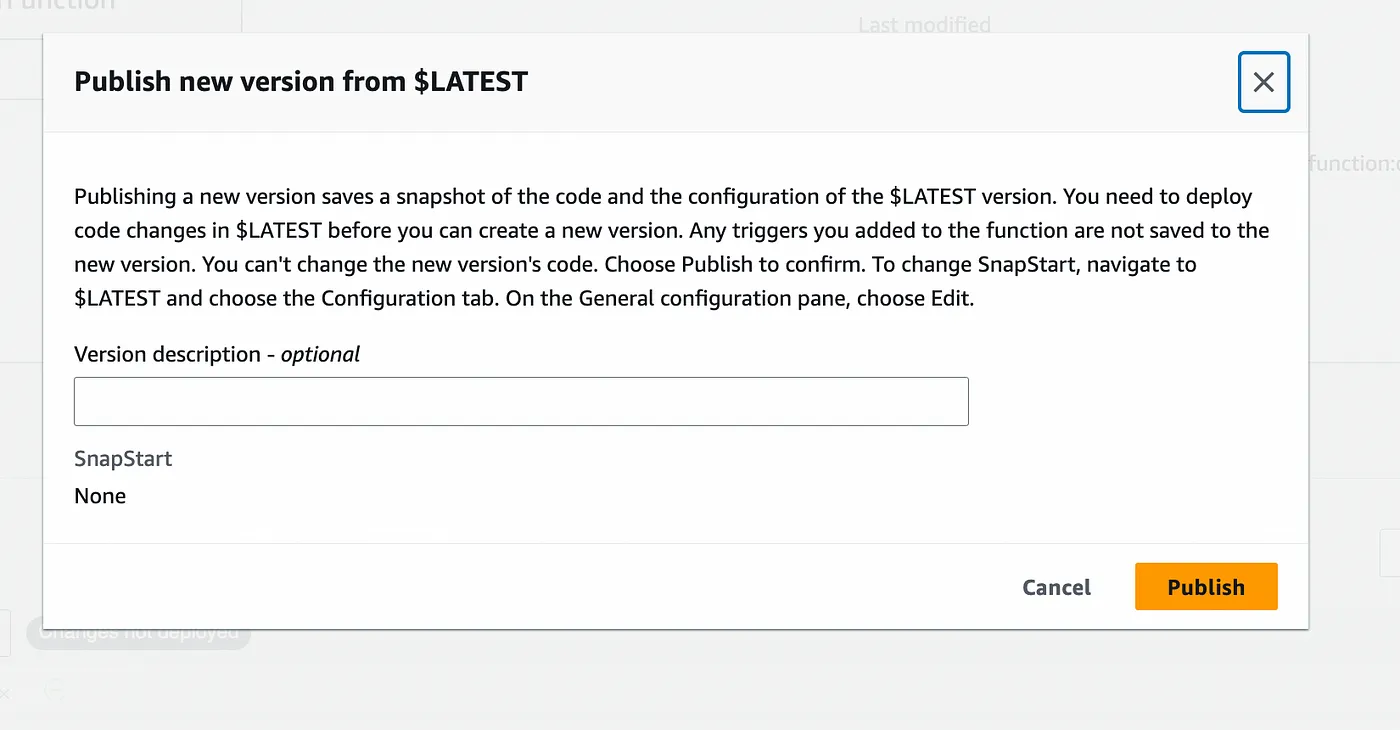
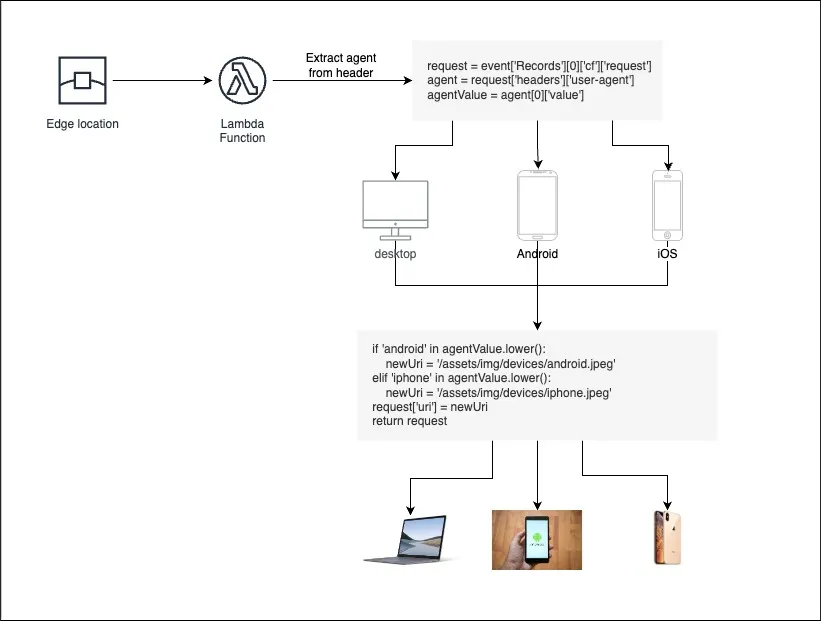
The Lambda function intended for deployment on edge locations must be created in the N.Virginia region. For the purposes of this demonstration, the Lambda function created to process requests for images and dynamically adjust them based on the requesting device will be created in Python, as shown in the code snippet below.
					import json
from urllib.parse import urlparse, unquote

def lambda_handler(event, context):
    # Extract user agent from request
    request = event['Records'][0]['cf']['request']
    agent = request['headers']['user-agent']
    agentValue = agent[0]['value']
    parsed_uri = urlparse(request['uri'])
    path = unquote(parsed_uri.path)
    newUri = parsed_uri
    if 'android' in agentValue.lower():
        newUri = '/assets/img/devices/android.jpeg'
    elif 'iphone' in agentValue.lower():
        newUri = '/assets/img/devices/iphone.jpeg'
    request['uri'] = newUri
    return request
Dania Alrefai
Dania Alrefai
Start the Conversation Today
Let's Talk


